Easy Zucchini Bars Recipe-Delicious & Moist
Zucchini bars are an absolute revelation, a sweet treat that cleverly hides a healthy secret! If you’ve ever found yourself with an abundance of zucchini from your garden or a great farmer’s market haul, you know the struggle of trying to use it all up. Well, fret no more! These delightful zucchini bars are the perfect solution, transforming humble summer squash into a moist, tender, and utterly delicious dessert. People adore these bars because they’re incredibly versatile – perfect for a breakfast on the go, an afternoon snack, or even a light dessert. What truly makes these zucchini bars special is their ability to be both a guilt-free indulgence and a crowd-pleaser. You get that satisfying sweetness, a hint of spice, and a texture that’s simply divine, all thanks to the magic of zucchini.

Zucchini Bars
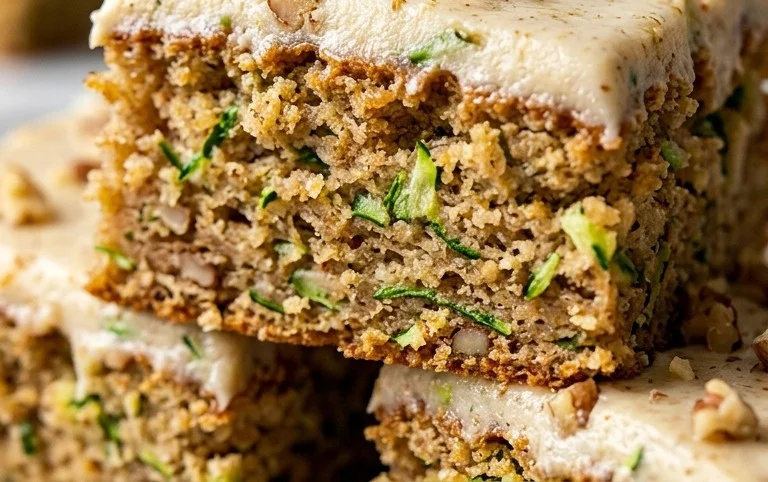
These Zucchini Bars are a delightful way to use up that garden abundance of zucchini, transforming it into a moist, flavorful, and utterly addictive treat. Forget any preconceived notions you might have about zucchini in desserts; it lends an incredible tenderness and moisture without imparting any overt vegetable flavor. They’re like a spiced, tender cake studded with the subtle goodness of zucchini, all topped with a luscious cream cheese frosting. Perfect for bake sales, potlucks, or simply enjoying with a cup of coffee, these bars are sure to become a favorite.
Ingredients:
- 2 cups All Purpose Flour
- 3/4 cup Brown Sugar
- 3/4 cup White Sugar
- 3/4 teaspoon Baking Soda
- 2 teaspoon Baking Powder
- 2 1/2 teaspoon Cinnamon
- 1 teaspoon salt
- 1/2 teaspoon vanilla
- 1/2 teaspoon Ground Nutmeg
- 1/2 teaspoon Ground Ginger
- 2 whole Eggs
- 1/2 cup Oil
- 1/2 cup Applesauce
- 2 cups Zucchini, Shredded
- 8 ounces Cream Cheese (Softened)
Instructions:
-
Preheat and Prep Your Pan:
The first step to baking these delightful Zucchini Bars is to get your oven ready and your baking pan prepared. Preheat your oven to 350 degrees Fahrenheit (175 degrees Celsius). This is a standard baking temperature that works perfectly for cakes and bars, ensuring even cooking. While the oven is heating, grab a 9×13 inch baking pan. It’s crucial to grease and flour this pan thoroughly. You can use butter or cooking spray for greasing. Once greased, sprinkle a thin layer of all-purpose flour over the entire surface, tapping out any excess. This creates a non-stick barrier, preventing your delicious bars from sticking to the pan and ensuring easy removal once they’re baked. Some bakers also like to line their pan with parchment paper, leaving an overhang on the sides. This makes lifting the entire baked rectangle out of the pan even easier.
-
Combine the Dry Ingredients:
In a large mixing bowl, whisk together all of your dry ingredients. This includes the 2 cups of all-purpose flour, 3/4 cup of brown sugar, 3/4 cup of white sugar, 3/4 teaspoon of baking soda, 2 teaspoons of baking powder, 2 1/2 teaspoons of cinnamon, 1 teaspoon of salt, 1/2 teaspoon of ground nutmeg, and 1/2 teaspoon of ground ginger. Whisking them together thoroughly ensures that the leavening agents (baking soda and baking powder) and the spices are evenly distributed throughout the flour mixture. This is essential for consistent rise and flavor in your bars. If you don’t whisk well, you might end up with pockets of unmixed baking soda or spices, which can affect the texture and taste. Take a moment to really get in there and break up any brown sugar clumps.
-
Combine the Wet Ingredients and Mix the Batter:
In a separate medium-sized bowl, whisk together the wet ingredients: the 2 whole eggs, 1/2 cup of oil, 1/2 cup of unsweetened applesauce, and 1/2 teaspoon of vanilla extract. Whisk until the eggs are well beaten and the mixture is smooth. Now, add the wet ingredients to the bowl containing your dry ingredients. Using a spatula or a wooden spoon, gently mix until just combined. Be careful not to overmix the batter at this stage. Overmixing can develop the gluten in the flour too much, leading to tough bars. It’s perfectly fine if there are a few small lumps. The next important addition is the shredded zucchini. Gently fold in the 2 cups of shredded zucchini. You want to distribute it evenly throughout the batter without overworking it. The zucchini will release moisture as it bakes, contributing to the incredible tenderness of these bars.
-
Bake the Zucchini Bars:
Pour the batter evenly into your prepared 9×13 inch baking pan. Spread it out with your spatula to ensure an even layer. Place the pan in the preheated oven and bake for 30-40 minutes. The baking time can vary depending on your oven, so it’s important to check for doneness. To test if the bars are ready, insert a toothpick into the center. If it comes out clean or with just a few moist crumbs attached (not wet batter), they are done. If it comes out with wet batter, continue baking for another few minutes and test again. Resist the urge to open the oven door too frequently during baking, as this can cause the temperature to drop and affect the evenness of the bake.
-
Prepare and Apply the Cream Cheese Frosting:
While your zucchini bars are baking or cooling, it’s time to whip up the luscious cream cheese frosting. In a medium bowl, beat the 8 ounces of softened cream cheese until it’s smooth and creamy. You can use an electric mixer on medium speed for this, or a sturdy whisk if you prefer. Make sure your cream cheese is truly softened; cold cream cheese will result in a lumpy frosting. Once smooth, you can optionally add a bit more powdered sugar and a splash of vanilla to sweeten it further, though this recipe doesn’t strictly require additional sugar in the frosting itself, letting the bar’s sweetness shine. Once the zucchini bars have completely cooled in the pan on a wire rack (this is crucial – frosting warm bars will result in a melted mess), spread the cream cheese frosting evenly over the top of the cooled bars. Use an offset spatula for a smooth, even finish.
-
Chill and Serve:
After frosting, place the pan of zucchini bars in the refrigerator for at least 30 minutes to an hour. This allows the frosting to set and makes the bars much easier to cut. Once chilled, carefully lift the bars out of the pan using the parchment paper overhang, if you used it, or by carefully running a knife around the edges to loosen them. Cut the bars into desired serving sizes. You can aim for 12 larger bars or 24 smaller squares. These Zucchini Bars are best served chilled. They store well in an airtight container in the refrigerator for up to 3-4 days. Enjoy the delightful combination of moist spiced cake and tangy cream cheese frosting!
Conclusion:
I hope you’re as excited as I am to bake these delightful zucchini bars! They truly are a fantastic way to use up that abundant garden zucchini and transform it into something incredibly delicious. The moist, tender crumb, subtly sweet flavor, and hint of spice make them a perfect treat for any occasion. Whether you’re looking for a healthier dessert option or a simple afternoon pick-me-up, these zucchini bars deliver on all fronts.
They are wonderfully versatile. Enjoy them plain with a cup of coffee or tea, dust them with a little powdered sugar for a touch of elegance, or serve them warm with a scoop of vanilla ice cream for a more decadent dessert. For variations, feel free to add chopped nuts like walnuts or pecans for an extra crunch, or stir in chocolate chips for a richer flavor profile. A sprinkle of cinnamon or nutmeg in the batter also adds a lovely warmth.
I truly encourage you to give this recipe a try. It’s straightforward, forgiving, and the results are consistently amazing. You’ll be amazed at how a humble zucchini can be the star of such a wonderful baked good. Happy baking!
Frequently Asked Questions:
Can I make these zucchini bars ahead of time?
Absolutely! These zucchini bars store beautifully. Once completely cooled, you can wrap them tightly in plastic wrap or store them in an airtight container at room temperature for up to 3 days, or in the refrigerator for up to a week. They actually tend to get even more moist and flavorful after a day or two.
What if I don’t have fresh zucchini? Can I use frozen?
While fresh zucchini is preferred for its texture and moisture content, you can use frozen zucchini in a pinch. Ensure you thaw it completely and squeeze out as much excess water as possible before adding it to the batter. This step is crucial to prevent soggy bars.
How can I make sure my zucchini bars aren’t too moist?
The key to avoiding overly moist zucchini bars is to properly prepare your zucchini. Grate it using the large holes of a box grater and then, most importantly, squeeze out as much liquid as you possibly can using your hands or by wrapping it in a clean kitchen towel or cheesecloth. This simple step makes a significant difference in the final texture.
Zucchini Bars
Moist and delicious zucchini bars with a creamy frosting.
Ingredients
-
2 cups All Purpose Flour
-
3/4 cup Brown Sugar
-
3/4 cup White Sugar
-
3/4 teaspoon Baking Soda
-
2 teaspoon Baking Powder
-
2 1/2 teaspoon Cinnamon
-
1 teaspoon salt
-
1/2 teaspoon vanilla
-
1/2 teaspoon Ground Nutmeg
-
1/2 teaspoon Ground Ginger
-
2 whole Eggs
-
1/2 cup Oil
-
1/2 cup Applesauce
-
2 cups Zucchini, Shredded
-
8 ounces Cream Cheese (Softened)
Instructions
-
Step 1
Preheat oven to 350°F (175°C). Grease and flour a 9×13 inch baking pan. -
Step 2
In a large bowl, whisk together flour, brown sugar, white sugar, baking soda, baking powder, cinnamon, salt, nutmeg, and ginger. -
Step 3
In a separate bowl, whisk together eggs, oil, applesauce, and vanilla. -
Step 4
Add the wet ingredients to the dry ingredients and mix until just combined. Fold in the shredded zucchini. -
Step 5
Pour batter into the prepared baking pan and spread evenly. -
Step 6
Bake for 30-35 minutes, or until a wooden skewer inserted into the center comes out clean. -
Step 7
While the bars are baking, prepare the frosting by beating together softened cream cheese and a touch of vanilla and powdered sugar (optional, if desired for sweetness). The recipe as provided only lists cream cheese as an ingredient for frosting preparation implicitly, thus just cream cheese is listed here. -
Step 8
Let the bars cool completely before frosting.
Important Information
Nutrition Facts (Per Serving)
It is important to consider this information as approximate and not to use it as definitive health advice.
Allergy Information
Please check ingredients for potential allergens and consult a health professional if in doubt.