Spooky Peanut Butter Spider Cookies Halloween Treat
Peanut Butter Spider Cookies are an absolute delight for any occasion, especially as Halloween creeps closer. These aren’t just any cookies; they’re a whimsical edible creation that brings smiles to faces of all ages. What is it about these peanut buttery little critters that captures our hearts? It’s the perfect marriage of classic, comforting peanut butter cookie flavor with an irresistible, spooky-cute presentation. Each bite delivers that familiar, delicious peanut butter goodness, but the real magic happens when you see those adorable spider legs emerge from the dough. They’re incredibly fun to make, and even more fun to share, making them a guaranteed hit at any gathering or just a special treat for a cozy afternoon. Get ready to spin some deliciousness with our easy recipe for Peanut Butter Spider Cookies!
Peanut Butter Spider Cookies
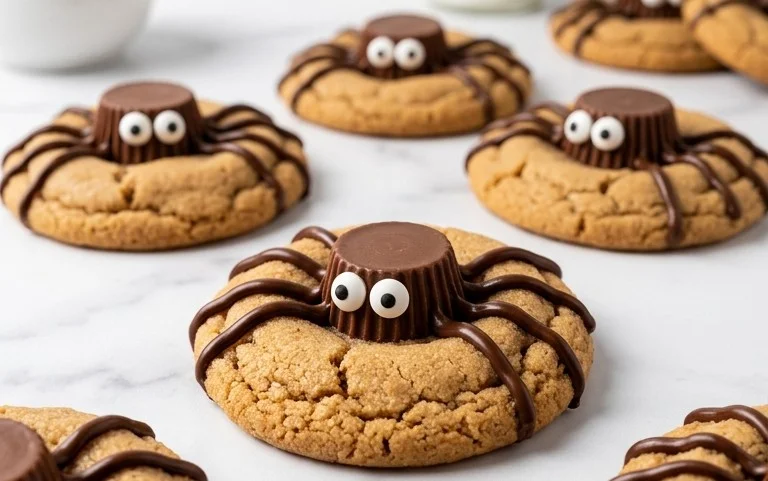
Get ready for some spooky fun in the kitchen with these adorable and delicious Peanut Butter Spider Cookies! These cookies are the perfect treat for Halloween parties, bake sales, or just a fun afternoon activity with the kids. The base is a classic, chewy peanut butter cookie, but the real magic happens when we transform them into little eight-legged critters. The combination of soft peanut butter cookie, a rich chocolate drizzle, and a sweet Reese’s Peanut Butter Cup body is simply irresistible. They’re not just cute; they’re incredibly tasty! Let’s get baking!
Ingredients:
- ½ cup (113g) unsalted butter (1 stick, room temperature)
- ½ cup (107g) brown sugar
- ⅓ cup (66g) granulated sugar
- ¾ cup (201g) creamy peanut butter (not natural)
- 1 large egg
- 1 tsp vanilla extract
- 1 ½ cups (180g) all purpose flour
- 1 tsp baking soda
- ½ tsp baking powder
- ½ tsp salt
- Granulated sugar (for rolling the cookies)
- Mini Reese’s Peanut Butter Cups
- ½ cup (85g) semi-sweet chocolate chips (for melting)
- ½ tsp neutral oil (for melting)
- Candy eye balls.
Preparing the Cookie Dough
1. Cream the Butter and Sugars: In a large mixing bowl, combine the softened unsalted butter, brown sugar, and granulated sugar. Using an electric mixer on medium speed, beat these ingredients together until the mixture is light and fluffy, about 2-3 minutes. This step is crucial for creating a tender cookie with a good texture, as it incorporates air into the dough. Scrape down the sides of the bowl as needed to ensure everything is well combined.
2. Incorporate Wet Ingredients: Add the creamy peanut butter to the butter and sugar mixture. Beat until well combined. Then, crack in the large egg and stir in the vanilla extract. Mix on low speed until just combined, being careful not to overmix at this stage. Overmixing can lead to tough cookies. You want a smooth, cohesive batter that smells wonderfully of peanut butter and vanilla.
3. Combine Dry Ingredients and Mix into Wet: In a separate medium bowl, whisk together the all-purpose flour, baking soda, baking powder, and salt. Gradually add the dry ingredients to the wet ingredients in the large mixing bowl, mixing on low speed until just combined and no dry streaks of flour remain. It’s important to add the dry ingredients gradually to prevent flour from flying out of the bowl and to ensure even distribution of the leavening agents. The dough will be thick and slightly sticky.
4. Chill and Shape the Dough: Cover the bowl with plastic wrap and refrigerate the dough for at least 30 minutes. Chilling the dough makes it easier to handle and helps prevent the cookies from spreading too much during baking. While the dough is chilling, preheat your oven to 350°F (175°C) and line baking sheets with parchment paper. Once chilled, roll the dough into 1-inch balls. Roll each ball generously in granulated sugar. This sugary coating will give the cookies a lovely sparkle and a delightful crunch. Place the sugar-coated balls about 2 inches apart on the prepared baking sheets.
5. Bake and Cool: Bake the cookies for 9-11 minutes, or until the edges are lightly golden brown and the centers look set. Be careful not to overbake, as they will continue to cook slightly on the baking sheet. Let the cookies cool on the baking sheets for 5 minutes before transferring them to a wire rack to cool completely. This resting period on the baking sheet allows the cookies to firm up and prevents them from breaking when you move them.
Decorating Your Spider Cookies
Once your peanut butter cookies have cooled completely, it’s time for the fun part – transforming them into spooky spiders!
1. Prepare the Chocolate Drizzle: In a small microwave-safe bowl, combine the semi-sweet chocolate chips and the neutral oil. Microwave on 50% power for 30-second intervals, stirring after each interval, until the chocolate is smooth and completely melted. The oil helps to make the chocolate smoother and easier to drizzle. Alternatively, you can melt the chocolate using a double boiler.
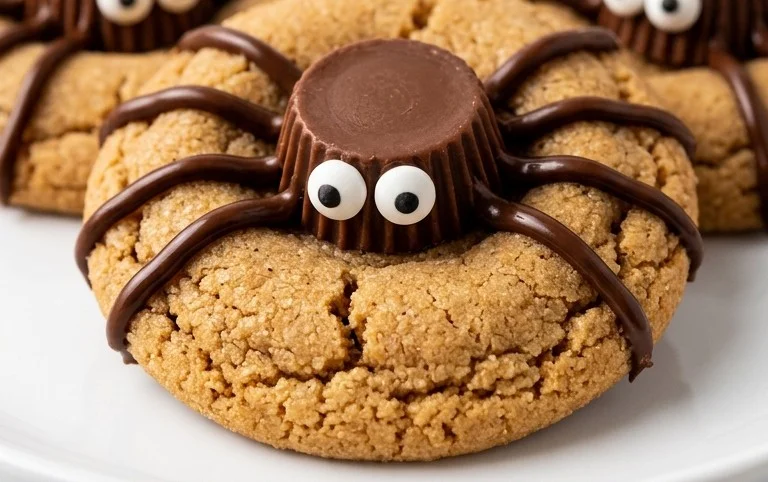
2. Create the Spider Legs: Transfer the melted chocolate to a small piping bag or a resealable plastic bag with one corner snipped off. You can also use a fork or a toothpick for this, but a piping bag gives you more control. Gently pipe eight “legs” radiating from the sides of each cooled peanut butter cookie. You want to create thin, wavy lines that resemble spider legs. Some can be longer, some shorter, for a more realistic (and spooky!) effect.
3. Add the Spider Body: Once you’ve piped the legs, place a Mini Reese’s Peanut Butter Cup on the top center of each cookie, over where the legs meet. Gently press it down so it adheres to the cookie. This will serve as the spider’s body. The warmth from the cookie can help it stick.
4. Attach the Candy Eyes: Using a tiny dot of the melted chocolate, “glue” two candy eyeballs onto the front of each Reese’s Peanut Butter Cup. Place them close together for a cute, wide-eyed spider look. You can also use small dabs of icing if you prefer.
5. Allow to Set: Let the decorated cookies sit at room temperature or in the refrigerator for about 15-20 minutes to allow the chocolate drizzle to set completely. This will ensure your spooky spider decorations stay in place.
Enjoy your delightfully creepy and delicious Peanut Butter Spider Cookies! They are sure to be a hit with everyone who dares to take a bite.
Conclusion:
And there you have it! These Peanut Butter Spider Cookies are an absolute blast to make and even more fun to eat. The perfect blend of chewy peanut butter cookie and creepy-crawly candy decoration makes them a guaranteed hit for any occasion, especially around Halloween. They’re simple enough for bakers of all skill levels, and the results are always impressive and delicious. I love how adaptable they are, too!
These cookies are fantastic on their own, but I also love serving them with a tall glass of cold milk. They’re also a wonderful addition to any Halloween party spread, bake sale, or just a special treat for the family. Feel free to get creative with your spider decorations! You can use different colored candies for the eyes or even add a little edible glitter for some extra spookiness.
I really encourage you to give these Peanut Butter Spider Cookies a try. They bring so much joy and deliciousness, and the smiles they’ll bring are truly rewarding. So grab your ingredients, get your baking game on, and let’s create some spooky culinary magic together!
Frequently Asked Questions:
Can I make these cookies ahead of time?
Absolutely! These cookies can be stored in an airtight container at room temperature for up to 3-4 days. They actually taste even better the next day as the flavors meld together. Just make sure they are completely cooled before storing.
What kind of peanut butter works best?
For this recipe, I find that creamy peanut butter works wonderfully to give you that classic chewy texture. However, you can certainly experiment with crunchy peanut butter if you prefer a bit of texture in your cookies. Natural peanut butters might require slight adjustments to the dry ingredients, so sticking to standard processed peanut butter is usually the most foolproof option.
How can I store the leftover candies for the spiders?
Any leftover candy eyes or licorice laces can be stored in a small, airtight container or a resealable bag at room temperature. They’ll be ready to go for your next batch or any other fun decorating project!
Peanut Butter Spider Cookies
Spooky and delicious peanut butter cookies decorated to look like spiders, perfect for Halloween or any time you want a fun treat. These cookies feature a rich peanut butter base with chocolate spider legs and candy eyes.
Ingredients
-
½ cup (113g) unsalted butter, room temperature
-
½ cup (107g) brown sugar
-
⅓ cup (66g) granulated sugar
-
¾ cup (201g) creamy peanut butter
-
1 large egg
-
1 tsp vanilla extract
-
1 ½ cups (180g) all purpose flour
-
1 tsp baking soda
-
½ tsp baking powder
-
½ tsp salt
-
Granulated sugar, for rolling
-
Mini Reese’s Peanut Butter Cups
-
½ cup (85g) semi-sweet chocolate chips
-
½ tsp neutral oil
-
Candy eye balls
Instructions
-
Step 1
Preheat oven to 375°F (190°C). Line baking sheets with parchment paper. -
Step 2
In a large bowl, cream together the softened butter and both sugars until light and fluffy. -
Step 3
Beat in the peanut butter, egg, and vanilla extract until well combined. -
Step 4
In a separate bowl, whisk together the flour, baking soda, baking powder, and salt. -
Step 5
Gradually add the dry ingredients to the wet ingredients, mixing until just combined. Do not overmix. -
Step 6
Roll the dough into 1-inch balls and then roll each ball in granulated sugar. Place on the prepared baking sheets. -
Step 7
Bake for 9-11 minutes, or until the edges are lightly golden. Let cool on the baking sheets for a few minutes before transferring to a wire rack to cool completely. -
Step 8
Melt the chocolate chips with the neutral oil in a microwave-safe bowl, stirring every 30 seconds until smooth. Transfer to a piping bag or a small zip-top bag with a corner snipped off. -
Step 9
To create the spiders: Cut Mini Reese’s Peanut Butter Cups in half. Pipe two legs from the bottom of each cookie for the front legs. Use the remaining halves to create the body and the remaining four legs. -
Step 10
Place two candy eyes on the top of each cookie to complete the spider.
Important Information
Nutrition Facts (Per Serving)
It is important to consider this information as approximate and not to use it as definitive health advice.
Allergy Information
Please check ingredients for potential allergens and consult a health professional if in doubt.